PreloadApps User Guide

Learn how to use PreloadApps to open your daily apps, folders, and websites automatically after Windows startup. This guide explains the main screen, add options, settings, license activation, and update checking in simple steps.

Apps

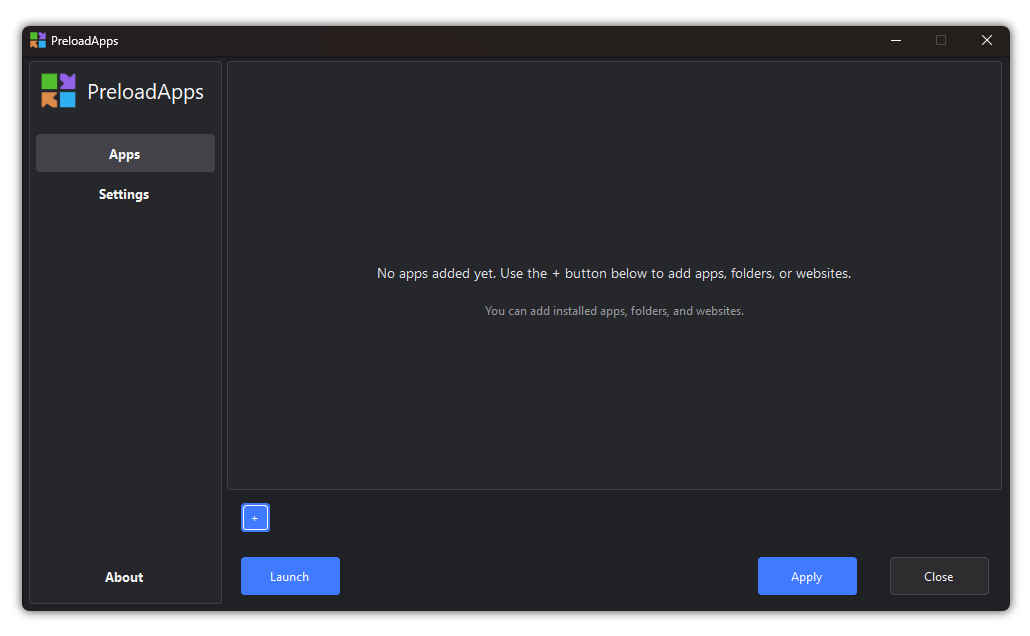
The Apps screen is the main place where you manage the apps, folders, and websites you want PreloadApps to open.

When no items are added yet, PreloadApps shows a message asking you to use the + button. After you add items, they will appear in this area as your startup launch list.

External image

Main buttons on the Apps screen

+ Button
Use the + button to add a new app, folder, or website to PreloadApps.

Launch
Click Launch to manually open your saved app list anytime. This is useful when you want to test your list or open everything without restarting Windows.

Apply
Click Apply after making changes. This saves your added items, settings, order, delays, and other changes.

Close
Click Close to close the window. Depending on your settings, PreloadApps may close fully or continue running in the system tray.

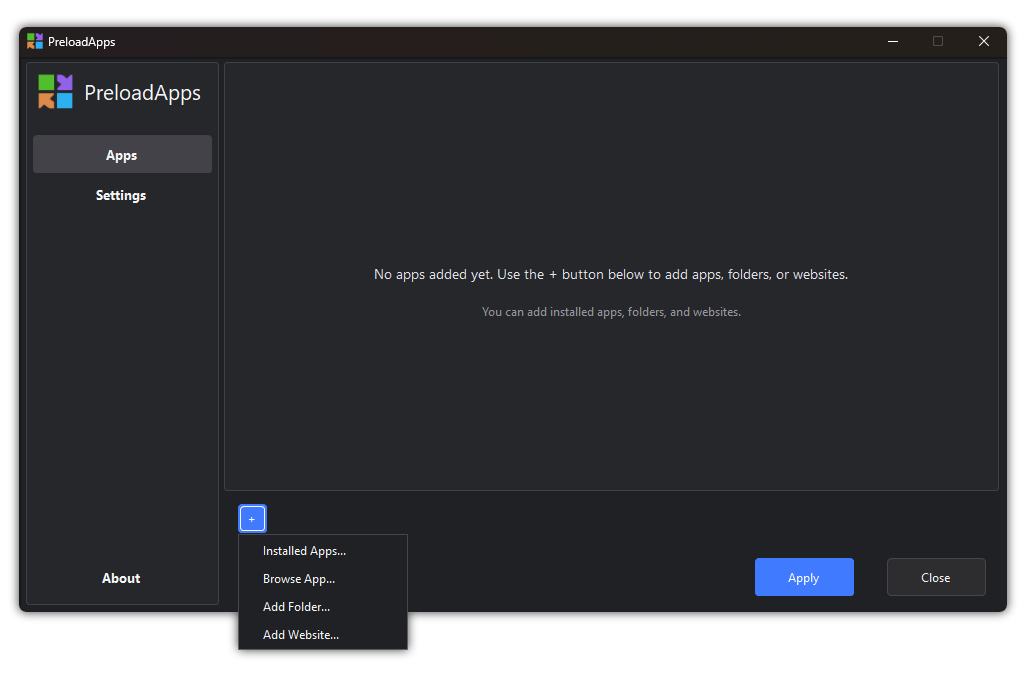
Add Menu

When you click the + button, PreloadApps shows four options.

  • Installed Apps
  • Browse App
  • Add Folder
  • Add Website
External image

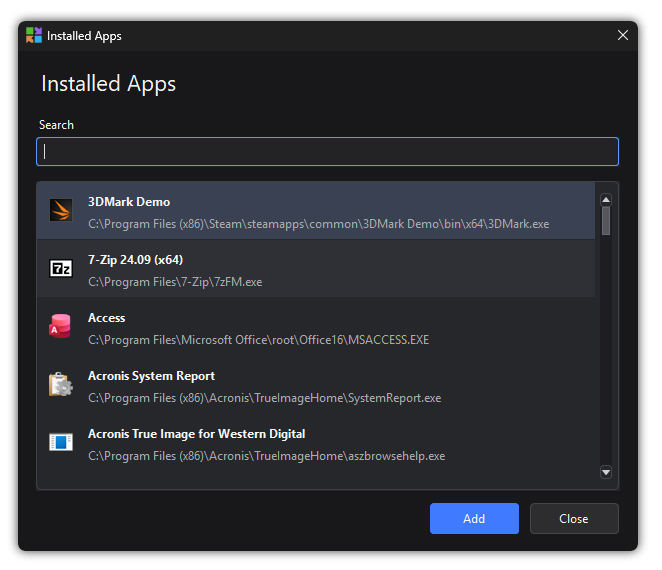
Installed Apps

Use Installed Apps to choose from apps detected on your computer.

This is the easiest way to add common apps because PreloadApps shows the app name, icon, and location.

In the Installed Apps window:

Search
Type part of an app name to quickly find it.

App List
The list shows apps found on your computer. Each item shows the app icon, app name, and app path.

Add
Select an app from the list and click Add to include it in PreloadApps.

Close
Click Close to exit without adding an app.

Some apps may show longer paths or system-style names. This is normal, especially for Microsoft Store apps or apps installed in special locations.

External image

Adding and Editing Apps

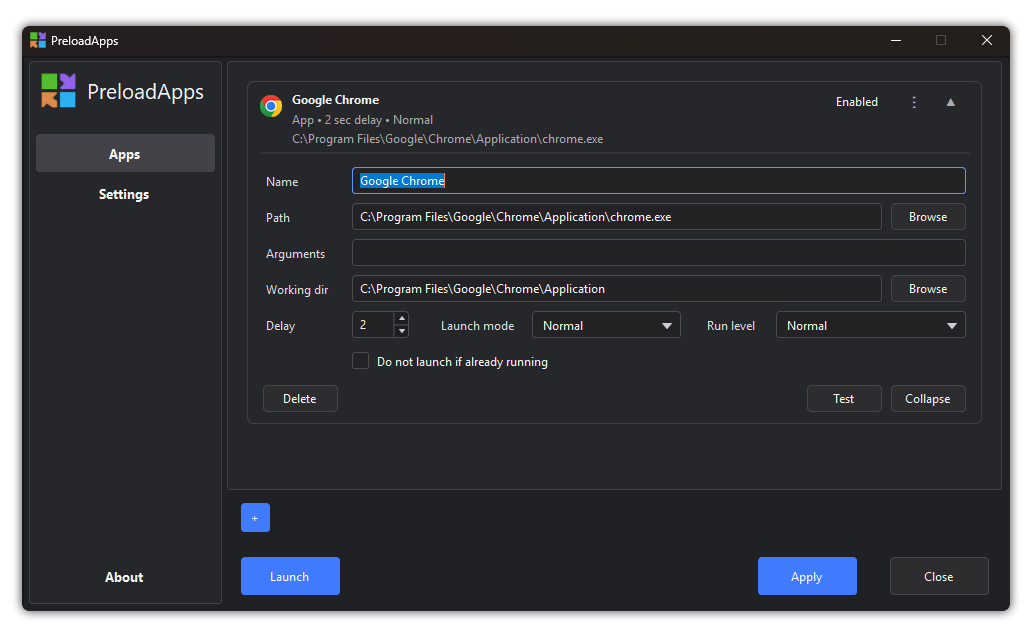
After you add an app, it appears as an item card in the Apps screen.

Each item card shows the item name, type, delay, launch mode, and path or address. You can expand the card to view and edit more options.

Most users only need to check the name, delay, and launch mode. The other options are useful when you want more control.

External image

Name

The Name field is the display name shown in PreloadApps.

You can change this to any friendly name you like.

Example:

Google Chrome
Work Folder
Email Dashboard

Changing the name does not change the actual app, folder, or website. It only changes how it is shown inside PreloadApps.

Path

The Path field shows the location of the app or file on your computer.

For apps, this is usually the .exe file path.

Example:

C:\Program Files\Google\Chrome\Application\chrome.exe

You normally do not need to edit this manually. If the path is wrong, you can use the Browse button to select the correct app or file again.

Arguments

The Arguments field is optional.

Most users can leave this empty.

Arguments are extra startup instructions passed to the app when it opens. Some advanced users may use this if an app supports command-line options.

For normal daily use, you can ignore this field.

Working Directory

The Working dir field tells the app which folder to use as its starting folder.

PreloadApps usually fills this automatically when you add an app.

Most users do not need to change it.

If an app does not open correctly, or if it needs to start from a specific folder, you can use the Browse button to choose the correct working directory.

Delay

The Delay option controls how many seconds PreloadApps waits after launching the previous item.

Example:

Delay: 2 seconds

This helps avoid opening everything at the exact same moment.

A small delay is useful when you have many apps in your list. It gives Windows a little time between launches and can make startup feel smoother.

Recommended values:

1–2 seconds for normal apps
3–5 seconds for heavier apps

Launch Mode

Launch mode controls how the app window should open.

PreloadApps includes three launch modes.

Normal

Normal opens the app normally.

This is recommended for most apps.

Use this when you want the app to open in its usual window state.

Minimized

Minimized asks Windows to open the app minimized.

This works well for many normal desktop apps.

However, some apps may ignore the minimized request and still open normally. This depends on how the app itself is built.

Force Minimized

Force Minimized makes a stronger attempt to minimize the app after it starts.

This is useful for apps that do not follow the normal minimized launch request.

For many Microsoft Store apps, Force Minimized may work better than normal Minimized mode.

However, minimized launch is not guaranteed for every app. Some apps may still open normally because of splash screens, launchers, update windows, helper processes, or custom startup behavior.

This is normal and does not mean PreloadApps is broken. Some apps simply do not allow their startup window to be controlled fully.

Note: Minimized and Force Minimized modes depend on how each app behaves. Some apps support it properly, while others may still open normally because of splash screens, launchers, update windows, or helper processes.

Run Level

Run level controls whether the app should be launched normally or as administrator.

Normal

Use Normal for most apps.

This is the recommended option.

Administrator

Use Administrator only for apps that need admin permission.

When an app is launched as administrator, Windows may show a UAC permission prompt. This is normal Windows behavior.

If you want PreloadApps to automatically launch administrator apps after Windows login, you may also need to use Admin startup mode in Settings.

For normal apps like browsers, email apps, folders, and websites, keep Run level as Normal.

Do Not Launch If Already Running

Enable Do not launch if already running if you want PreloadApps to skip the app when it is already open.

This is useful for apps like:

Browsers
Email apps
Chat apps
Cloud sync apps

Example: If Google Chrome is already running, PreloadApps will skip opening another copy of Chrome.

This helps avoid duplicate windows for apps you may already have open.

Some apps use helper processes or multiple background processes, so detection may depend on how the app is built.

Enabled / Disabled

Each item can be enabled or disabled.

When an item is Enabled, PreloadApps will launch it.

When an item is Disabled, it stays in your list but will not be launched.

This is useful when you temporarily do not want to open an item, but you do not want to delete it.

Test

Click Test to check whether the selected item opens correctly.

This is useful after adding or editing an app, folder, or website.

If the item opens correctly when you click Test, it should also work when you click Launch or when PreloadApps runs after Windows startup.

Collapse

Click Collapse to close the expanded item details and return the card to a smaller view.

This helps keep the Apps screen clean when you have several items.

Delete

Click Delete to remove the item from PreloadApps.

Deleting an item only removes it from your PreloadApps list. It does not uninstall the app, delete the folder, or remove the website.
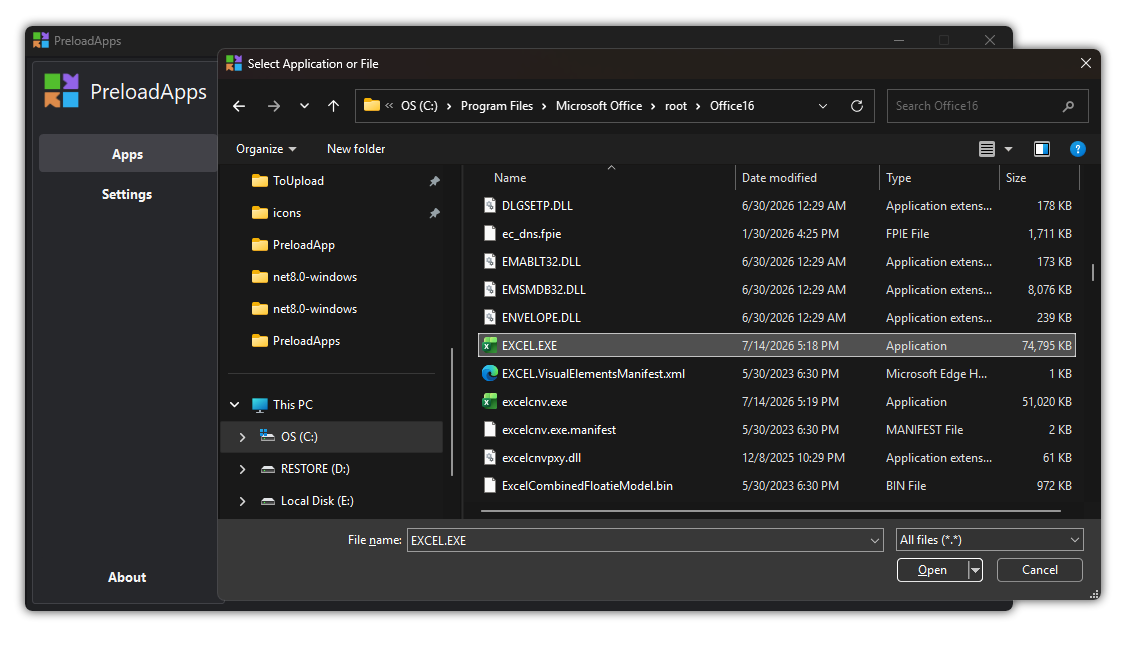
Browse App

Use Browse App when the app you want is not shown in the Installed Apps list.

This lets you manually choose an app or file from your computer. After selecting it, PreloadApps adds it to your launch list.

This option is useful when:

You installed an app in a custom folder.
The app does not appear in the Installed Apps list.
You want to add a specific program file manually.

External image

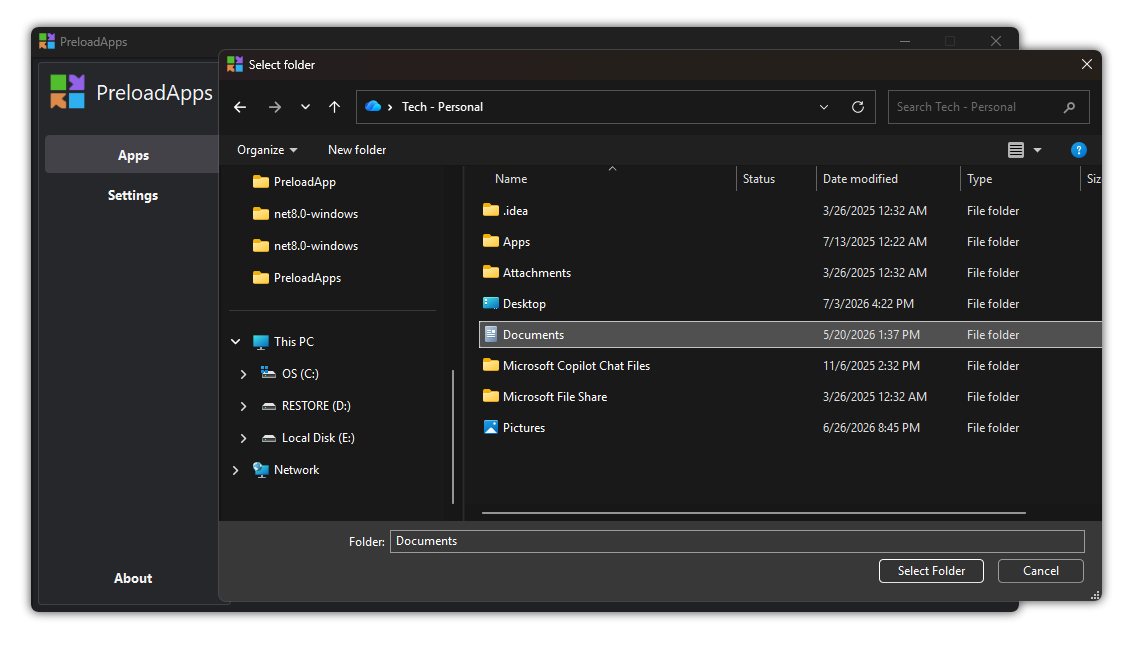
Add Folder

Use Add Folder to open a folder automatically after Windows startup.

This is useful for folders you open every day, such as project folders, work folders, Downloads, Documents, or any frequently used location.

Examples:

C:\Users\YourName\Documents
C:\Users\YourName\Downloads
C:\Work\Projects
C:\

After adding a folder, PreloadApps will open it using Windows File Explorer.

External image
External image

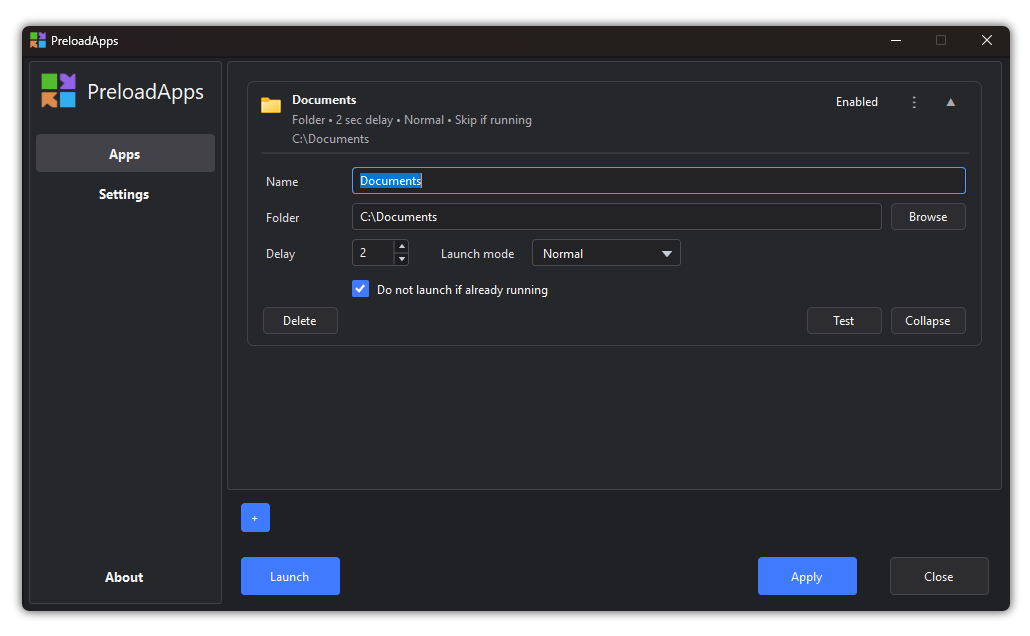
Folder Item Details

After you add a folder, it appears as a folder item in the Apps screen.

A folder item is used to open a folder location automatically after Windows startup or when you click Launch.

Name

The Name field is the display name shown in PreloadApps.

You can change it to a simple friendly name.

Example:

Documents
Downloads
Work Folder
Projects

Changing the name only changes how the folder is shown inside PreloadApps. It does not rename the actual folder on your computer.

Folder

The Folder field shows the folder location that PreloadApps will open.

Example:

C:\Documents
C:\Users\YourName\Downloads
C:\Work\Projects

Use the Browse button if you want to choose a different folder.

When the folder item launches, it opens in Windows File Explorer.

Delay

The Delay option controls how many seconds PreloadApps waits after launching the previous item.

This is useful if you want folders to open after your main apps have started.

Example:

Delay: 2 seconds

For most folders, 1 or 2 seconds is enough.

Launch Mode

The Launch mode option controls how the folder window should open.

Normal

Opens the folder normally in File Explorer.

This is recommended for most users.

Minimized

Asks Windows to open the folder minimized.

This may work depending on how Windows File Explorer handles the request.

Force Minimized

Makes a stronger attempt to minimize the folder window after it opens.

This can be useful if you want the folder to open quietly, but the result may still depend on Windows/File Explorer behavior.

Do Not Launch If Already Running

Enable Do not launch if already running if you want PreloadApps to avoid opening the same folder again when it is already open.

This can help prevent duplicate File Explorer windows.

Test

Click Test to check whether the folder opens correctly.

Delete

Click Delete to remove the folder from PreloadApps.

This only removes the folder from your PreloadApps list. It does not delete the actual folder from your computer.


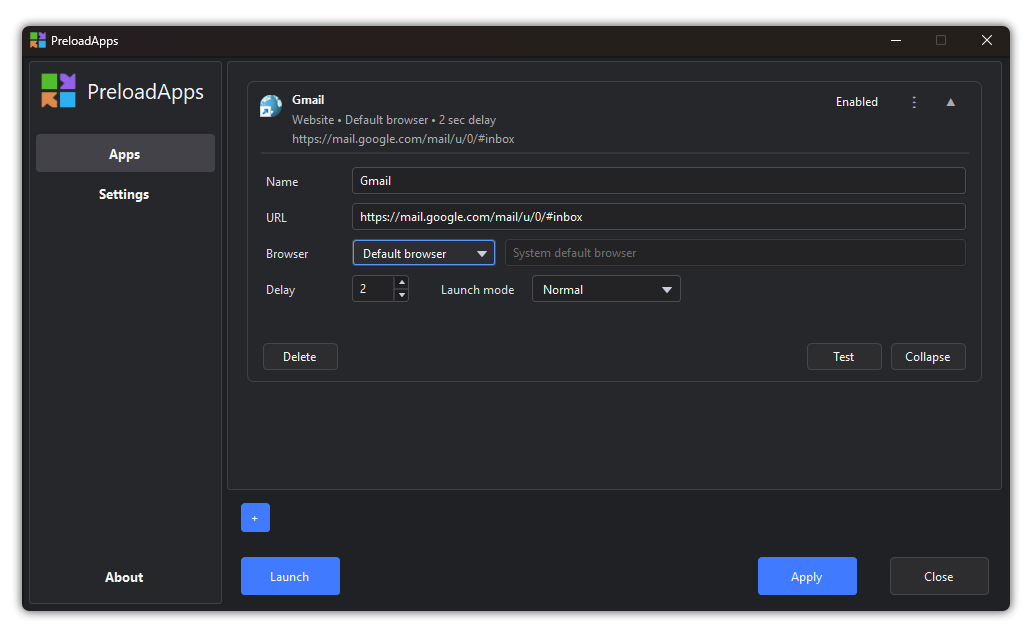
Add Website

Use Add Website to open a website automatically after Windows startup.

This is useful for email, dashboards, admin panels, reports, cloud tools, support pages, or any website you use daily.

External image

Name

The Name field is the display name shown in PreloadApps.

Use a simple name that helps you identify the website.

Example:

Gmail
Outlook
Work Dashboard
Support Panel

Changing the name only changes how the website is shown inside PreloadApps. It does not change the website address.

Website Address

The website address is the link that PreloadApps will open.

Example:

https://mail.google.com
https://outlook.office.com
https://preloadapps.com

It is better to use the full website address starting with:

https://

or:

http://

Browser

Websites open in your browser.

If PreloadApps is set to use the default browser, the website opens in your normal Windows default browser.

If you choose a custom browser in PreloadApps, the website opens using that selected browser.

This is useful if you want certain websites to always open in a specific browser.

Delay

The Delay option controls how many seconds PreloadApps waits after launching the previous item.

This is useful when opening websites along with apps.

Example:

Delay: 2 seconds

For example, you may want Chrome or Edge to open first, then open your websites a few seconds later.

Launch Mode

The Launch mode option controls how the browser window should open when the website is launched.

Normal

Opens the website normally in the browser.

This is recommended for most websites.

Minimized

Asks the browser to open minimized.

This may work with some browsers, but not all browsers follow minimized launch requests the same way.

Force Minimized

Makes a stronger attempt to minimize the browser after opening the website.

This may work better in some cases, but it still depends on how the browser behaves.

Important Note About Minimized Website Launch

For websites, minimized behavior depends mostly on the browser.

Some browsers may open normally even if Minimized or Force Minimized is selected. This can happen because the browser may already be running, restoring previous tabs, showing a startup page, or handling the website through an existing browser process.

This is normal browser behavior.

Do Not Launch If Already Running

This option can help avoid repeated launches where possible.

For websites, this may depend on the browser and how the website is opened. Browsers can already have many tabs and windows, so this option may not always behave the same way as normal apps.

If you always want the website to open when PreloadApps launches, keep this option turned off.

Test

Click Test to check whether the website opens correctly.

Delete

Click Delete to remove the website from PreloadApps.

This only removes the website from your PreloadApps list. It does not affect your browser bookmarks or browser history.

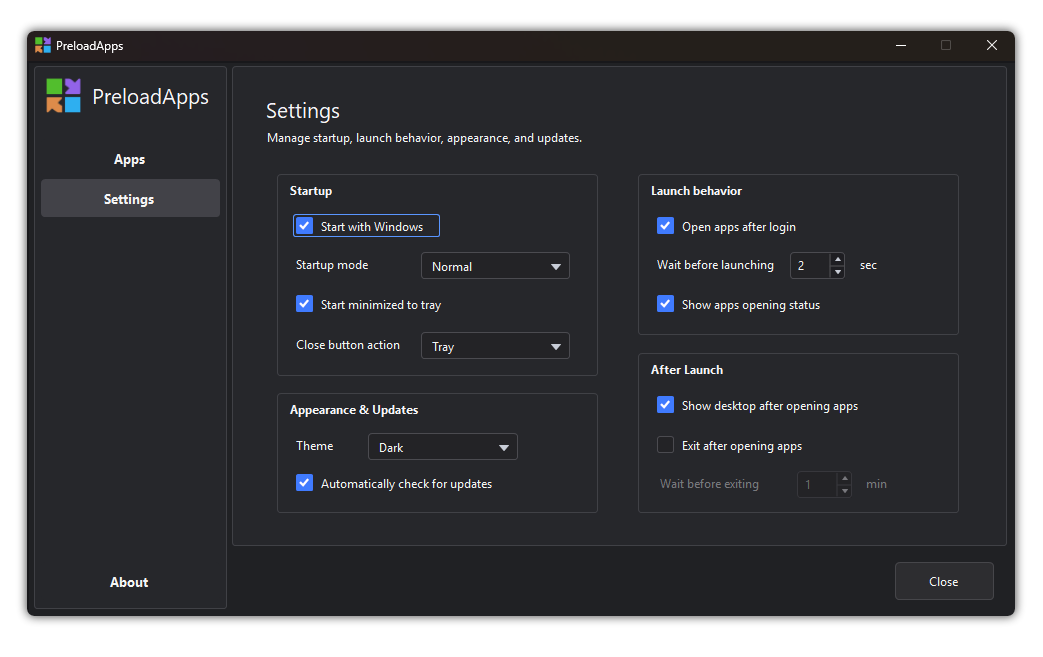
Settings

The Settings screen lets you control how PreloadApps starts, how it opens your apps, how it looks, and how updates are checked.

External image

Startup

Start with Windows

Enable Start with Windows if you want PreloadApps to start automatically when you log in to Windows.

When this is turned on, PreloadApps can run in the background and open your saved app list after login, depending on your launch behavior settings.

Startup Mode

Startup Mode controls how PreloadApps starts with Windows.

Normal
Recommended for most users. Use this if your apps do not need administrator permission.

Admin
Use this only if you need PreloadApps to launch apps that require administrator permission.

When Admin mode is used, Windows may show a UAC permission prompt depending on your system settings. This is normal Windows behavior.

Start Minimized to Tray

When Start minimized to tray is enabled, PreloadApps starts quietly in the system tray instead of opening the main window.

This is useful if you want PreloadApps to work in the background without showing the main window every time Windows starts.

Close Button Action

This option controls what happens when you click the Close button.

If it is set to Tray, clicking Close sends PreloadApps to the system tray.

If it is set to close the app, clicking Close exits PreloadApps.

Use Tray if you want PreloadApps to stay available in the background.


Launch Behavior

Open Apps After Login

Enable Open apps after login if you want PreloadApps to automatically open your saved app list after you log in to Windows.

If this is turned off, PreloadApps can still start with Windows, but it will not automatically launch your apps. You can still click Launch manually whenever needed.

Wait Before Launching

This setting adds a small delay before PreloadApps starts opening your items after Windows login.

This is useful because Windows may still be loading startup services and background apps immediately after login.

A short delay, such as 2 to 5 seconds, can help make startup smoother.

Show Apps Opening Status

When Show apps opening status is enabled, PreloadApps shows a small status window while your apps are being opened.

This lets you see what PreloadApps is currently launching.

Turn this off if you prefer a quieter startup experience.


After Launch

Show Desktop After Opening Apps

When this option is enabled, PreloadApps shows the Windows desktop after it finishes opening your apps, folders, and websites.

This can be useful if multiple windows open and you want to return to a clean desktop view after startup.

Exit After Opening Apps

When this option is enabled, PreloadApps exits automatically after it finishes opening your saved items.

Use this if you only want PreloadApps to launch your items and then close itself.

Leave it disabled if you want PreloadApps to remain available in the system tray after launching.

Wait Before Exiting

This option is available when Exit after opening apps is enabled.

It controls how long PreloadApps waits before closing itself after launching your items.


Appearance & Updates

Theme

Use Theme to choose how PreloadApps looks.

You can choose a light theme, dark theme, or system theme depending on your preference.

Automatically Check for Updates

When this option is enabled, PreloadApps checks for new updates automatically.

Keeping PreloadApps updated is recommended because updates may include improvements, bug fixes, and new features.

About, Activation, and Updates

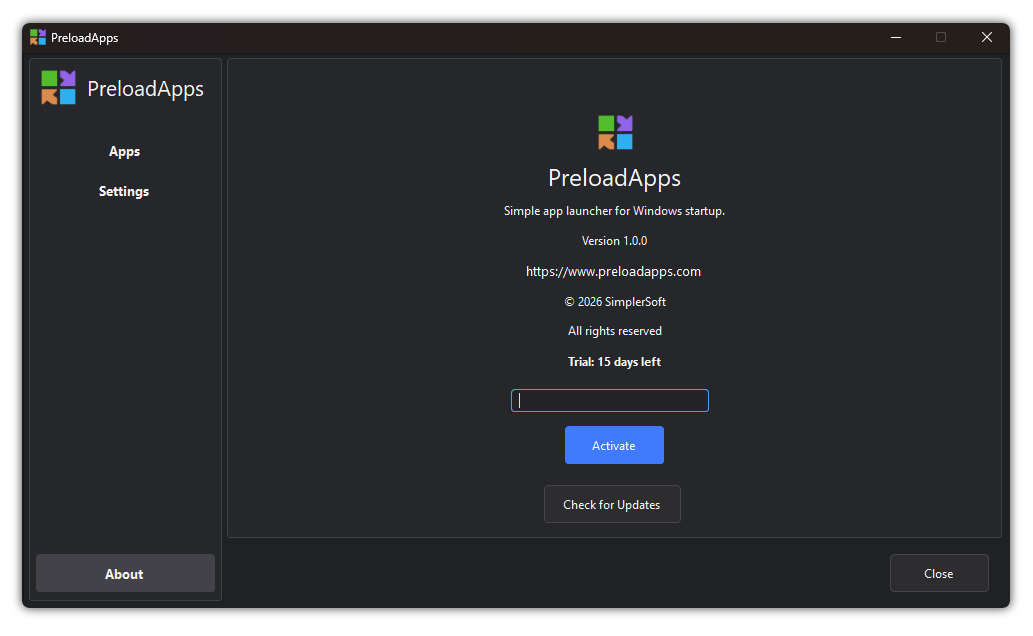
The About screen shows your PreloadApps version, website link, trial or license status, license activation box, and update check option.

External image

Trial Status

PreloadApps includes a free trial so you can test the app before purchasing a license.

During the trial, you can try the main features and decide whether PreloadApps fits your workflow.

The About screen shows how many trial days are left.

Activating PreloadApps

After purchasing PreloadApps, your license key is sent to the email address used during payment.

To activate PreloadApps:

1. Open PreloadApps.
2. Click About.
3. Paste your license key into the license box.
4. Click Activate.

After successful activation, PreloadApps will unlock the lifetime version on your computer.

Important: If you do not see your license email in your inbox, please check your Spam, Junk, Promotions, or Updates folder. License emails can sometimes be filtered there by email providers.

If you still cannot find your license key, contact support with your purchase email address and payment details.

Check for Updates

Click Check for Updates to manually check whether a newer version of PreloadApps is available.

If an update is available, PreloadApps will guide you through the update process.

If you are already using the latest version, PreloadApps will let you know.

Need Help?

If you have trouble activating your license, checking for updates, or using PreloadApps, please contact support from the website.

When contacting support, it helps to include:

Your PreloadApps version
Your Windows version
Your purchase email address, if related to license activation
A short description of the issue
A screenshot, if possible

This helps us understand the issue faster and provide better support.